The Utilities module manages SMS campaigns, and also keeps a log of account verifications in the terminal.
Table of Contents
|
Feature
|
Description
|
|
Active Merchant
|
Select the merchant in the drop-down to view the associated merchant transaction
|
|
Language
|
Select the preferred language in the drop-down
|
|
|
Select to view dashboard in full screen
|
|
|
Select to minimize the menu bar
|
|
Search
|
Enter the entity to display the transaction data based on the search
|
|
|
Change the color of the widget
|
|
-
|
Collapse the widget. Click again to expand the widget
|
|
|
View the widget in new page
|
|
Copy
|
Copy the transaction details in clipboard. The steps to copy the transaction are:
|
|
Excel
|
Download the transaction data in excel format
|
|
PDF
|
Download the transaction data in PDF format
|
|
Print
|
Print the transaction data
|
|
|
Select to display the number of transaction per page. The valid values are 5, 10, 15, 25, 50, 100.
|
SMS Messages
SMS campaigns help you as a merchant, keep a tab on SMS communication between you and your clients. To create a new SMS Message,
- Click the Add SMS Message link in Scheduled Messages screen.
- The Add SMS Message screen is displayed

| Feature | Description |
| Text box | Enter the SMS message you want to send. Each message contains up to 160 characters. |
| SMS campaign customers | This is list of customers targeted with your campaign. Select the appropriate option in the drop-down |
| Enter numbers | This is a list of numbers that are entered manually, apart from the customers added via the campaign |
| Send it every… days | Schedules the interval in days between sending each SMS message to selected customers |
| OT customers | Check the box to send the message to merchants belonging to Old Tech |
| All Customers | Check the box to send the message to all the relevant customers |
| Schedule message | Check the box to send schedule message to the customer |
| Send | Click the Send button to send the message |
| Don't send. Just Schedule | Click the Don't send. Just Schedule button to send the message in the specific period of time. |
| Cancel | Click the Cancel button to cancel and close the Add SMS Messages screen |
Scheduled Messages
Scheduled Messages provides the dashboard view of all the Users' SMS message information.

| Field | Description |
| ID | Displays the ID number |
| Messages | Displays the SMS message of the User |
| OT Customer | Displays whether the customer is in old terminal or not |
| Campaign Customers | Displays whether the customer is a campaign customer or not |
| Selected Campaigns | Displays the selected campaigns details |
| Custom Numbers | Displays the custom numbers |
| Active | Displays whether the customer is active or not |
| Last Run | Displays specific timeline on which SMS message is sent |
| Period | Displays the count of SMS message sent |
| Edit | Click the Edit button to edit the SMS message |
| Delete | Click the Delete button to delete the SMS message. |
Scheduled Messages - Edit
Click the Edit button. The Edit SMS Message Screen is displayed.
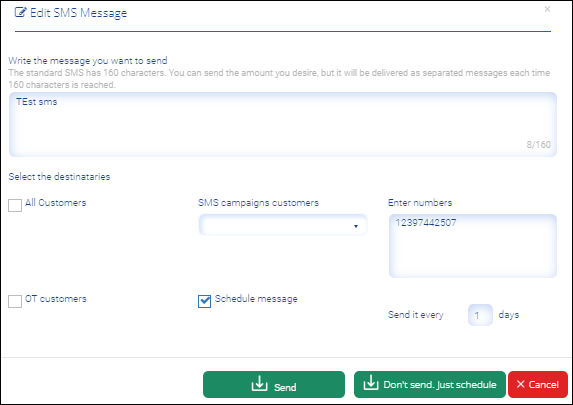 Figure 3: Scheduled Messages - Edit SMS Message.
| Feature | Description |
| Text box | Edit the SMS message you want to send. Each message contains up to 160 characters. |
| SMS campaign customers | This is list of customers targeted with your campaign. Modify the appropriate option in the drop-down, if required |
| Enter numbers | This is a list of numbers you can edit that are entered manually, apart from the customers added via the campaign |
| Send it every… days | Edit the Schedules interval in days between sending each SMS message to selected customers |
| OT customers | Uncheck/Check the box to send the message to merchants belonging to Old Tech, if required |
| All Customers | Uncheck/Check the box to send the message to all the relevant customers |
| Schedule message | Uncheck/Check the box to send schedule message to the customer |
| Send | Click the Send button to send the message |
| Don't send. Just Schedule | Click the Don't send. Just Schedule button to send the edited message in the specific period of time. |
| Cancel | Click the Cancel button to cancel and close the Add SMS Messages screen |
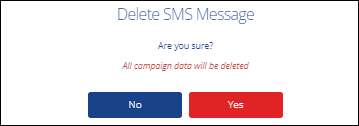
- Click the Delete button
- The Delete User dialog box is displayed.
- Click Yes to delete the User
- Click No to retain the User and close the Delete User dialog box.
Note:
If you click No all campaign data will be deleted.
SMS Campaigns Management
SMS campaigns Management help you as a merchant, keep a tab on SMS Campaigns communication between you and your clients.
To create a new SMS Campaign,
- Click the Add SMS Campaign link in SMS Campaign Management screen.
- The Add SMS Campaign screen is displayed


|
Feature
|
Description
|
|
SMS Payments: (Campaign Code)
|
Enter the SMS Campaign Code.
Note: The campaign code is a unique code global to ICG, it should have no more than 10 characters, containing numbers and letters only. |
|
SMS Pay Methods
|
Select the appropriate value. The valid values are:
|
|
SMS Fee Program
|
Select the appropriate value. The valid values are:
|
|
SMS Check Fee
|
Enter the SMS Check Fee.
Note: If you want a flat rate of $2.95, you would enter 2.95 and select Flat. If you want a percentage rate of 3.5%, you would enter 3.5 and select percentage. |
|
SMS Check Fee Type
|
Select the appropriate value. The valid values are:
|
|
SMS Card Fee
|
Enter the SMS Card Fee.
Note: If you want a flat rate of $2.95, you would enter 2.95 and select Flat. If you want a percentage rate of 3.5%, you would enter 3.5 and select percentage. |
|
SMS Card Fee Type
|
Select the appropriate value. The valid values are:
|
|
SMS RTP Fee
|
Enter the SMS RTP Fee.
Note: If you want a flat rate of $2.95, you would enter 2.95 and select Flat. If you want a percentage rate of 3.5%, you would enter 3.5 and select percentage. |
|
SMS RTP Fee Type
|
Select the appropriate value. The valid values are:
|
|
Start Date
|
Click the calendar widget and select the start date of the SMS campaign
|
|
End Date
|
Click the calendar widget and select the end date of the SMS campaign
|
|
Run Indefinitely
|
Check the box if the SMS campaign has to run indefinitely
|
|
Accept Recurring Transactions
|
Check the box to accept the recurring transactions
|
|
Activate
|
Click the Activate button to activate the SMS Campaign
|
|
Cancel
|
Click the Cancel button to cancel and close the Add Campaign screen
|
SMS Campaign Management
SMS Campaign Management provides the dashboard view of all the Users' SMS Campaign Management information.
| Field | Description |
| ID | Displays the ID number |
| Campaign Code | Displays the campaign code |
| SMS Pay Methods | Displays the SMS pay methods |
| Check Fee Type | Displays the check fee type |
| Card Fee Type | Displays the card fee type |
| Custom Numbers | Displays the custom numbers |
| Pay Method | Displays the pay method |
| Starts | Displays the start date of the SMS Campaign Management |
| Ends | Displays the end date of the SMS Campaign Management |
| Infinite | Displays the status of the service provided by the SMS Campaign Management |
| Recurring | Displays the status of the service provided by the SMS Campaign Management |
SMS Campaign Management - Edit
Click the Edit button. The Edit SMS Message Screen is displayed.
|
Feature
|
Description
|
|
SMS Payments: (Campaign Code)
|
Modify/Update the SMS Campaign Code.
Note: The campaign code is a unique code global to ICG, it should have no more than 10 characters, containing numbers and letters only. |
|
SMS Pay Methods
|
Select the appropriate value, if required. The valid values are:
|
|
SMS Fee Program
|
Select the appropriate value, if required. The valid values are:
|
|
SMS Check Fee
|
Modify/Update the SMS Check Fee.
Note: If you want a flat rate of $2.95, you would enter 2.95 and select Flat. If you want a percentage rate of 3.5%, you would enter 3.5 and select percentage. |
|
SMS Check Fee Type
|
Select the appropriate value, if required. The valid values are:
|
|
SMS Card Fee
|
Modify/Update the SMS Card Fee.
Note: If you want a flat rate of $2.95, you would enter 2.95 and select Flat. If you want a percentage rate of 3.5%, you would enter 3.5 and select percentage. |
|
SMS Card Fee Type
|
Select the appropriate value, if required. The valid values are:
|
|
SMS RTP Fee
|
Modify/Update the SMS RTP Fee.
Note: If you want a flat rate of $2.95, you would enter 2.95 and select Flat. If you want a percentage rate of 3.5%, you would enter 3.5 and select percentage. |
|
SMS RTP Fee Type
|
Select the appropriate value, if required. The valid values are:
|
|
Start Date
|
Click the calendar widget and select the start date of the SMS campaign, if required
|
|
End Date
|
Click the calendar widget and select the end date of the SMS campaign, if required
|
|
Run Indefinitely
|
Uncheck/Check the box if the SMS campaign has to run indefinitely
|
|
Accept Recurring Transactions
|
Uncheck/Check the box to accept the recurring transactions
|
|
Activate
|
Click the Activate button to activate the SMS Campaign, if required
|
|
Cancel
|
Click the Cancel button to cancel and close the Add Campaign screen, if required
|
SMS Campaign Management - Delete
- Click the Delete button
- The Delete User dialog box is displayed.
- Click Yes to delete the User
- Click No to retain the User and close the Delete User dialog box.
Note:
If you click No all campaign data will be deleted.
Verify Service
The verify menu makes account verification easy. There are two tabs:
- Info: This gives a general overview of the number of verifications done, verifications remaining, and the date when the verification was started.
- Verifications: Use this tab to verify any account details, including the Routing Number and Account Number.

The history tab provides a list of verifications done over a time period. Select the date range at the top of the table, and the status.
