Starting the Annual Review Process
The Annual Review is located in the left menu of the Online Terminal. The merchant will receive an email when the Annual Review is initiated by an ICG Representative.
|
Feature
|
Description
|
|
Active Merchant
|
Select the merchant in the drop-down to view the associated merchant transaction
|
|
Language
|
Select the preferred language in the drop-down
|
|
Select to view dashboard in full screen
|
|
|
|
Select to minimize the menu bar
|
|
Search
|
Enter the entity to display the transaction data based on the search
|
|
Previous
|
Go to previous tab
|
|
Next
|
Go to next tab
|
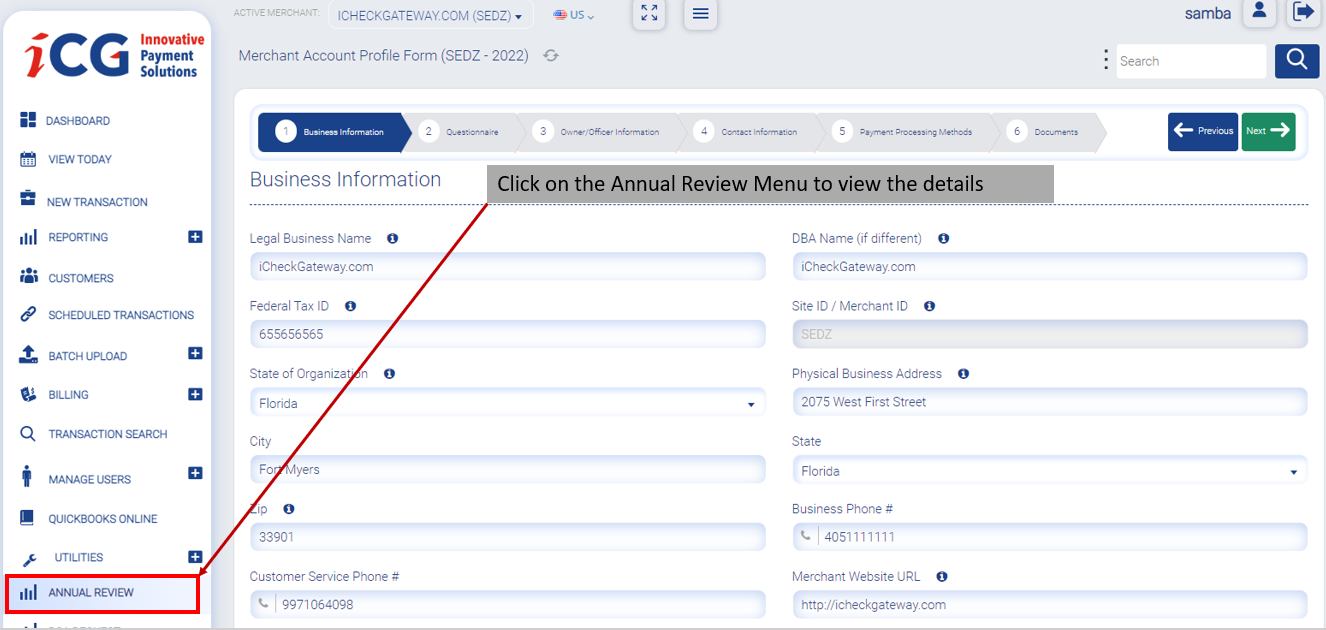
Figure 1: Annual Review page menu.
- If the Annual Review is up-to-date, no action is required from the Merchant side and you will see this message "Annual Review is up-to-date".
- Once a review email is triggered, the annual review page on the Online Terminal will display a form that you can use to fill and save the information.
Note:
Every page has some validation on the fields marked as mandatory, and you won't proceed to the next step or save the information without filling in the required information.
Initially, the Annual Review (AR) form in the New Online Terminal is filled with the merchant information which is already on file. A user can add, remove or update what’s on display.
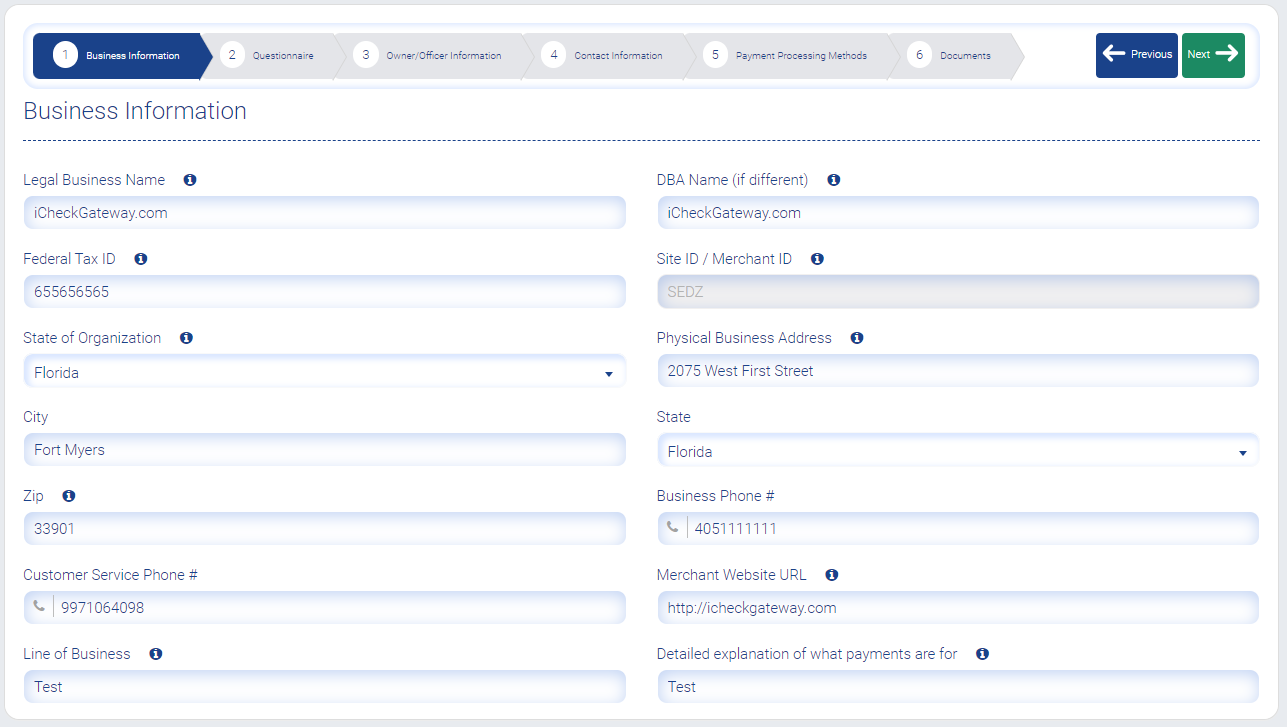
Step 1: Business Information
At this step, the user fills business information, as already shown by the fields in figure 2 below:
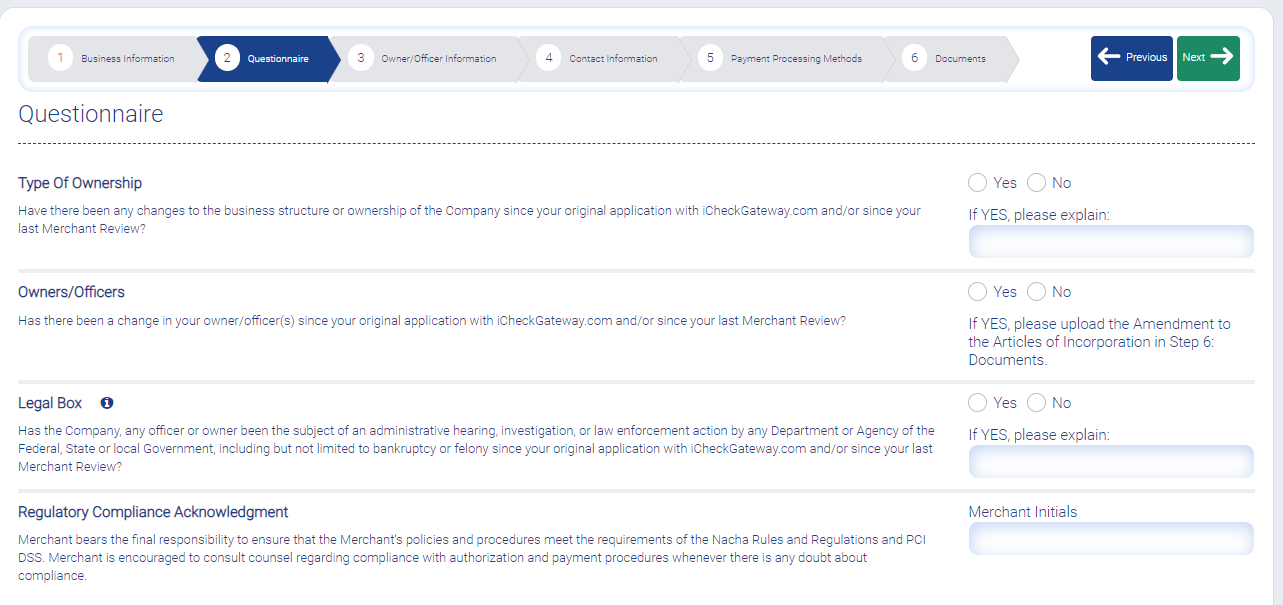
Step 2: Questionnaire
This form takes a legalese approach. The user indicates whether they are processing ACH transactions online, and the resultant legal standing that allows them to do the same. Complete the questionnaire, then click Next.
Step 3: Owner/Officer Information
Owner/Officer information tab is used to add owner/officer details. You can also add intermediary business ownership.
Note:
- Validation will appear for total % of Minimum ownership and Maximum ownership for added owner(s).
- Users will not be able to proceed until ownership has a minimum of 51% or a maximum of 100%. ALL individuals or businesses with at least 25% ownership in the business must be listed. (Please start with the largest shareholder and add additional owner/officers as needed.)

| Field | Description |
| Name | Enter the name |
| Title | Enter the title |
| % of Ownership | Enter the percentage of ownership |
| Home Address | Enter the home address |
| City | Enter the city name |
| State | Enter the state name |
| Zip | Enter the zip code |
| Email Address | Enter the email address |
| Phone Number | Enter the phone numbe |
| Last 4 Digits of SSN | Enter the last 4 digits of SSN |
| Date of Birth | Click the calendar widget. Select your date of birth |
| Feature | Description |
| Edit | Click the Edit button. The fields appear with owner/officer information. Modify/update the information |
| Delete | Click the Delete button. The respective owner/officer entry is deleted |
Intermediary Business Ownership
The intermediary business ownership information is added only if the business have other investors (business) who have 25% or greater ownership stake.
To add intermediary business ownership information, choose the appropriate radio button "Yes". The fields appear without any information. The user needs to fill the information.
Note:
By default No radio button is selected.

|
Field
|
Description
|
|
Intermediary Business Name
|
Enter the intermediary business name
|
|
Intermediary Contact Name
|
Enter the intermediary contact name
|
|
Intermediary Contact Title
|
Enter the intermediary contact title
|
|
Intermediary Business Ownership %
|
Enter the intermediary business ownership %
|
|
Intermediary Contact Phone #
|
Enter the intermediary contact phone number
|
|
Intermediary Contact Email
|
Enter the intermediary contact email address
|
|
Intermediary Business Tax ID
|
Enter the 9 digits intermediary business tax ID
|
Click the Add Intermediary Business Ownership button to add the information.
|
Feature
|
Description
|
|
Edit
|
Click the Edit button. The fields appear with intermediary business ownership information. Modify/update the information.
|
|
Delete
|
Click the Delete button. The respective intermediary business ownership entry is deleted
|
Step 4: Contact Information
In Contact Information screen, you can fill the information in the below sections:
- Authorized Signer
- Business Contact
- Technical Contact
- Authorized Support users
Authorized Signer
The authorized signer is responsible for the annual merchant account review and any account changes, such as bank account, mailing address, or other contacts on file.
Click the Add Signer button. The fields appear without any information. The user needs to fill the information.

| Field | Description |
| Authorized signer name | Enter the authorized signer name |
| Authorized signer email | Enter the authorized signer email |
| SMS Enabled phone number | Enter the SMS enabled phone number |
|
Feature
|
Description
|
|
Edit
|
Click the Edit button. The fields appear with authorized signer information. Modify/update the information.
|
|
Delete
|
Click the Delete button. The respective authorized signer entry is deleted
|
Business Contact
The business contact can create authorized support users or update email addresses for notifications. They cannot make account changes.

|
Field
|
Description
|
|
Business Contact Name
|
Enter the business contact name
|
|
Business Contact email
|
Enter the business contact email
|
Technical Contact
The technical contact would receive technical information such as notifications of maintenance windows, API credentials, etc.
![]()
|
Field
|
Description
|
|
Technical Contact Name
|
Enter the technical contact name
|
|
Technical Contact Email
|
Enter the technical contact email
|
Authorized Support Users
The authorized support users cannot make changes to the account, but can submit requests for support regarding processing, etc. These users are managed by the merchant in the Online Terminal and do not need to be reported on this form.

|
Field
|
Description
|
|
Notification Type
|
Email Address |
|
Billing Notices
(
|
Enter the email address to receive the billing notices
|
|
System Notices
(Includes copies of customer receipts, returned transaction notifications, declined recurring transaction notices)
|
Enter the email address to receive the system notices
|
|
Proof Of Authorization Requests (ACH Only)
(Receives any requests for documentation to prove an ACH transaction was authorized by the customer)
|
Enter the email address to receive any requests for documentation
|
Step 5: Payment Processing Methods
Payment Processing Methods screen allows the user to choose additional ways to process payments with iCheckGateway.com. The user has to acknowledge their details in the Authorized Signature by filling the necessary information.

- Check the appropriate option in the payment processing methods. The valid values are:
- Online Terminal
- Quickbooks Desktop Plugin
- IVR
- API Integration
- Payment Portal
- Quickbooks Online Plugin
- Shopping Cart Plugin
- iCG Invoicing
- Enter the details in the Details field.
Authorized Signature
The user acknowledges by providing the entering the information in the respective fields.

|
Field
|
Description
|
|
Print Owner/Officer Name
|
Enter the print owner/officer name
|
|
Date
|
Click the calendar widget. Select the date on which the user acknowledge
|
|
Email Address
|
Enter the email address
|
|
Title
|
Enter the title of the user
Mr.
Mrs.
Miss
|
|
Phone
|
Enter the phone number
|
Step 6: Documents
Once all the mandatory information is filled, the form will be auto saved. You have to upload the required document, and click the Send for Signature button.

You will receive an invitation from Adobe Sign to sign the form . This happens via the email you included at the “Authorize Signature” area (Step 6: Payment Processing Method).

The “Save & Submit” button will remain disabled until the form is signed.
Once signed, you’ll be redirected to a new page in the new online terminal that has a message, Thank you for signing the document.
