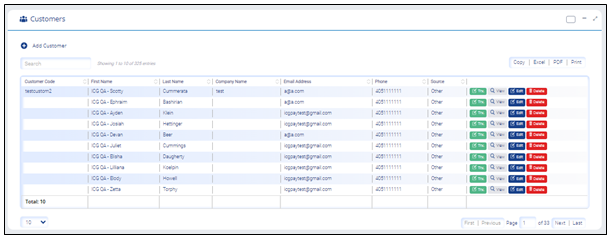
In Customers screen, you can generate customer reports and also add new customers.
Table of Contents
What to do
|
Feature
|
Description
|
|
Active Merchant
|
Select the merchant in the drop-down to view the associated merchant transaction
|
|
Language
|
Select the preferred language in the drop-down
|
|
|
Select to view dashboard in full screen
|
|
|
Select to minimize the menu bar
|
|
Search
|
Enter the entity to display the transaction data based on the search
|
|
|
Change the color of the widget
|
|
-
|
Collapse the widget. Click again to expand the widget
|
|
|
View the widget in new page
|
|
Copy
|
Copy the transaction details in clipboard. The steps to copy the transaction are:
|
|
Excel
|
Download the transaction data in excel format
|
|
PDF
|
Download the transaction data in PDF format
|
|
Print
|
Print the transaction data
|
|
|
Select to display the number of transaction per page. The valid values are 5, 10, 15, 25, 50, 100.
|
|
First
|
Go to first page
|
|
Previous
|
Go to previous page
|
|
Next
|
Go to next page
|
|
Last
|
Go to last page
|

|
Field
|
Description
|
|
Source
|
Select the source in the drop-down. The valid values are:
Note:
This section outlines the origin of the customer.
QuickBooks Online - If your account is linked to the QuickBooks online instance
Online Terminal - A client was created directly on this portal
Other - A client is created internally by an iCG admin or imported via an API
|
Customers
|
Field
|
Description
|
|
Search
|
Enter the entity to display the transaction data based on the search
|
|
Customer Code
|
Displays the customer code
|
|
First Name
|
Displays the first name
|
|
Last Name
|
Displays the last name
|
|
Company Name
|
Displays the company name
|
|
Email Address
|
Displays the email address of the customer
|
|
Phone
|
Displays the phone number of the customer
|
|
Source
|
Displays the source
|
|
|
Click here for the procedure to create New transaction
|
|
Displays the customer details. There are two tabs:
|
|
|
|
Edit the customer details. There are two tabs:
|
|
|
Delete the transaction data. The steps to delete the transaction are:
Note: All credit card data will be deleted too
|
Add Customer
Click the Add Customer link. There are two tabs:
- Details
- Payment Methods
Add Customer - Details
Click the Details tab in the Add Customer screen.

|
Field
|
Description
|
|
Customer Code
|
Enter the customer code
|
|
First Name
|
Enter the first name
|
|
Last Name
|
Enter the last name
|
|
Company Name
|
Enter the company name
|
|
Email Address
|
Enter the email address
|
|
Billing Address 1
|
Enter the billing address 1
|
|
Billing Address 2
|
Enter the billing address 2
|
|
Billing City
|
Enter the billing city name
|
|
Billing State/Province
|
Select the state/province from the drop-down
|
|
Billing Postal Code
|
Enter the billing postal code
|
|
Phone
|
Enter the phone number
|
|
Notes
|
Enter additional information, if any
|
| Click Save to save the added data | |
|
|
Click cancel to exit the Add Customer screen
|
Add Customer - Payment Methods
Click the Payment Methods tab in the Add Customer screen.

|
Field
|
Description
|
|
Method
|
Displays the method used for transaction
|
| Type |
Displays the type
|
|
Display
|
Displays the Credit Card number
|
|
|
Click the Delete button to delete the data
|
|
|
Click the Save button to save the data
|
|
|
Click cancel to exit the View Customer screen
|
 |
Click the Add button.
Select the appropriate option from the drop-down.
The valid values are:
|
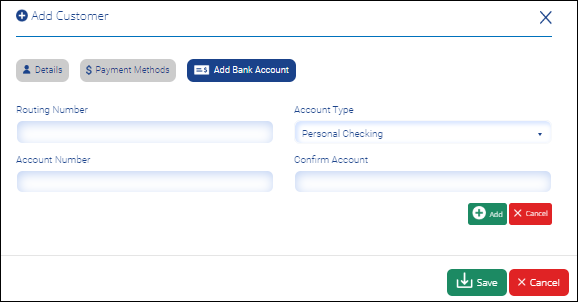
Add Customer - Payment Methods - Add Bank Account
Click the Payment Methods tab, click the Add button and then select the Add Bank Account from the drop-down in the Add Customer screen.
The Add Bank Account tab (Figure 6) is displayed.

|
Field
|
Description
|
|
Routing Number
|
Enter the routing number
|
| Account Number |
Enter the account number
|
|
Account Type
|
Select the account type from the drop-down.
The valid values are:
|
|
Confirm Account
|
Re-enter the account number Click the Delete button to delete the data
|
|
Click the Add button to Add Bank Account
|
|
|
|
Click cancel to exit the Add Bank Account tab
|
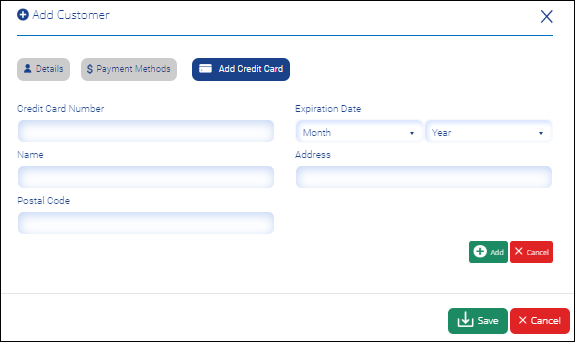
Click the Payment Methods tab, click the Add button and then select the Add Credit Card from the drop-down in the Add Customer screen.
The Add Credit Card tab (Figure 10) is displayed.

|
Field
|
Description
|
|
Credit Card Number
|
Enter the credit card number
|
| Name |
Enter the customer name
|
|
Postal Code
|
Enter the postal code
|
| Expiration Date |
|
| Address |
Enter the address
|
|
Click the Add button to Add Credit Card
|
|
|
Click cancel to exit the Add Credit Card
|
View Customer - Details
Click the Details tab in the View Customer screen.

|
Field
|
Description
|
|
Customer Code
|
Displays the customer code
|
|
First Name
|
Displays the first name
|
|
Last Name
|
Displays the last name
|
|
Company Name
|
Displays the company name
|
|
Email Address
|
Displays the email address
|
|
Billing Address 1
|
Displays the billing address 1
|
|
Billing Address 2
|
Displays the billing address 2
|
|
Billing City
|
Displays the billing city name
|
|
Billing State/Province
|
Displays the billing state/province
|
|
Billing Postal Code
|
Displays the billing postal code
|
|
Phone
|
Displays the phone number
|
|
Notes
|
Displays additional information, if any
|
|
|
|
|
|
Click cancel to exit the View Customer screen
|
View Customer - Payment Methods
Click the Payment Methods tab in the View Customer screen.

|
Field
|
Description
|
|
Method
|
Displays the method used for transaction
|
| Type |
Displays the type
|
|
Display
|
Displays the Credit Card number
|
|
|
|
|
|
Click cancel to exit the View Customer screen
|
Edit Customer - Details
Click the Details tab in the Edit Customer screen.

|
Field
|
Description
|
|
Customer Code
|
Edit the customer code
|
|
First Name
|
Edit the first name
|
|
Last Name
|
Edit the last name
|
|
Company Name
|
Edit the company name
|
|
Email Address
|
Edit the email address
|
|
Billing Address 1
|
Edit the billing address 1
|
|
Billing Address 2
|
Edit the billing address 2
|
|
Billing City
|
Edit the billing city name
|
|
Billing State/Province
|
Select the state/province from the drop-down
|
|
Billing Postal Code
|
Edit the billing postal code
|
|
Phone
|
Edit the phone number
|
|
Notes
|
Edit additional information, if any
|
| Click Save to save the edited data | |
|
|
Click cancel to exit the Edit Customer screen
|
Edit Customer - Payment Methods
Click the Payment Methods tab in the Edit Customer screen.

|
Field
|
Description
|
|
Method
|
Displays the method used for transaction
|
| Type |
Displays the type
|
|
Display
|
Displays the Credit Card number
|
|
|
Click the Delete button to delete the data
|
|
|
Click the Save button to save the data
|
|
|
Click cancel to exit the View Customer screen
|
|
|
Click the Add button.
Select the appropriate option from the drop-down.
The valid values are:
|
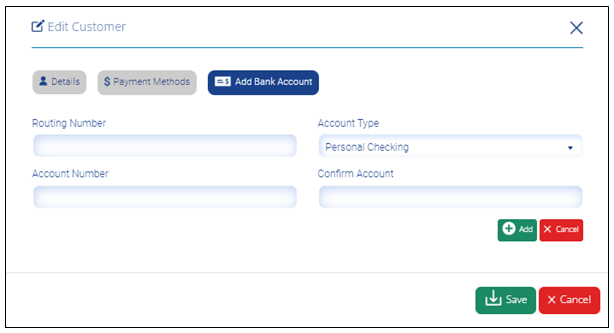
Edit Customer - Payment Methods - Add Bank Account
Click the Payment Methods tab, click the Add button and then select the Add Bank Account from the drop-down in the Edit Customer screen.
The Add Bank Account tab (Figure 14) is displayed.

|
Field
|
Description
|
|
Routing Number
|
Enter the routing number
|
| Account Number |
Enter the account number
|
|
Account Type
|
Select the account type from the drop-down.
The valid values are:
|
|
Confirm Account
|
Re-enter the account number Click the Delete button to delete the data
|
|
Click the Add button to Add Bank Account
|
|
|
|
Click cancel to exit the Add Bank Account tab
|
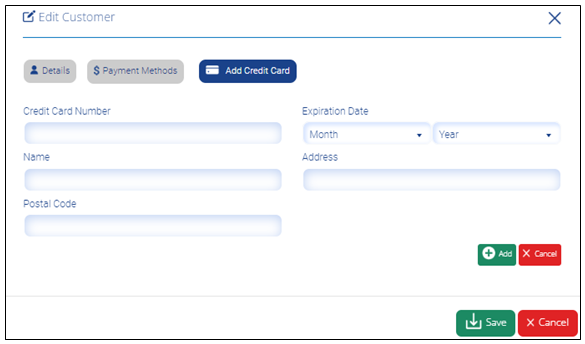
Edit Customer - Payment Methods - Add Bank Account
Click the Payment Methods tab, click the Add button and then select the Add Credit Card from the drop-down in the Edit Customer screen.
The Add Credit Card tab (Figure 16) is displayed.

|
Field
|
Description
|
|
Credit Card Number
|
Enter the credit card number
|
| Name |
Enter the customer name
|
|
Postal Code
|
Enter the postal code
|
| Expiration Date |
|
| Address |
Enter the address
|
|
Click the Add button to Add Credit Card
|
|
|
Click cancel to exit the Add Credit Card
|