Invoicing Module helps you track invoices associated with your clients and respective transactions. You can also generate invoice reports in excel and PDF format.
Table of Contents
What to do
|
Feature
|
Description
|
|
Active Merchant
|
Select the merchant in the drop-down to view the associated merchant transaction
|
|
Language
|
Select the preferred language in the drop-down
|
|
|
Select to view dashboard in full screen
|
|
|
Select to minimize the menu bar
|
|
Search
|
Enter the entity to display the transaction data based on the search
|
|
|
Change the color of the widget
|
|
-
|
Collapse the widget. Click again to expand the widget
|
|
|
View the widget in new page
|
|
Open
|
Displays the open invoice data
|
|
Paid
|
Displays the paid invoice data
|
|
Search
|
Enter the required entity to fetch the associated transaction details. The entity can be Invoice Number, Customer Name, Invoice Date, Source, Due Date
|
|
Copy
|
Copy the transaction details in clipboard. The steps to copy the transaction are:
|
|
Excel
|
Download the transaction data in excel format
|
|
PDF
|
Download the transaction data in PDF format
|
|
Print
|
Print the transaction data
|
|
|
Select to display the number of transaction per page. The valid values are 5, 10, 15, 25, 50, 100.
|
|
First
|
Go to first page
|
|
Previous
|
Go to previous page
|
|
Next
|
Go to next page
|
|
Last
|
Go to last page
|

|
Field
|
Description
|
|
Source
|
Select the source from the drop-down. The valid values are:
Note:
This section outlines the origin of the customer.
QuickBooks Online - If your account is linked to the QuickBooks online instance
Online Terminal - A client was created directly on this portal
Other - A client is created internally by an iCG admin or imported via an API
|
|
Invoice Status
|
Select the invoice status from the drop-down. The valid values are:
|
Invoicing - New Invoice
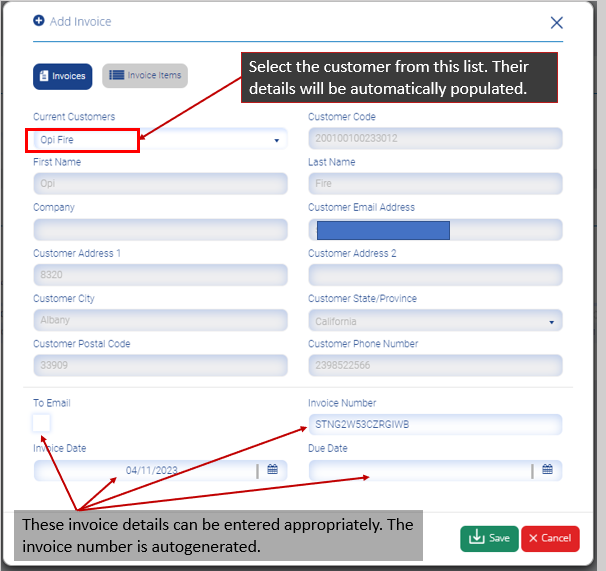
Click the New Invoice link in the invoicing section. The Add Invoice screen is displayed.

New Invoice - Add Invoice
In the Add Invoice screen there are two tabs.
-
Invoices
-
Invoice Items
Click the Invoices button in the Add Invoice screen.
|
Field
|
Description
|
|
Current Customers
|
|
|
To Email
|
Check the option To email to email the invoice to the registered email address of the customer.
|
|
Invoice Number
|
Invoice number is auto-generated by the system.
|
|
Invoice Date
|
Click the calendar widget. Select the invoice date.
|
|
Due Date
|
Click the calendar widget. Select the due date
|
|
Save
|
Click save to add invoice
|
|
Cancel
|
Close the add invoice screen
|
Click the Invoice items button in the Add Invoice screen.

- After the invoice items are added, click the Save button to save the changes to the invoice and its items.
- The invoice has now been saved to the list of invoices.
|
Field
|
Description
|
|
Search
|
Enter the entity to display the invoice data based on the search
|
|
Invoice Number
|
Displays the invoice number
|
|
Customer Name
|
Displays the customer name
|
|
Invoice Date
|
Displays the invoice date
|
|
Source
|
Displays the selected source
|
|
Due Date
|
Displays the due date
|
|
Invoice Status
|
Displays the invoice status
|
|
Paid Date
|
Displays the paid date
|
|
Amount
|
Displays the amount
|
|
Sales Tax
|
Displays the sales tax
|
|
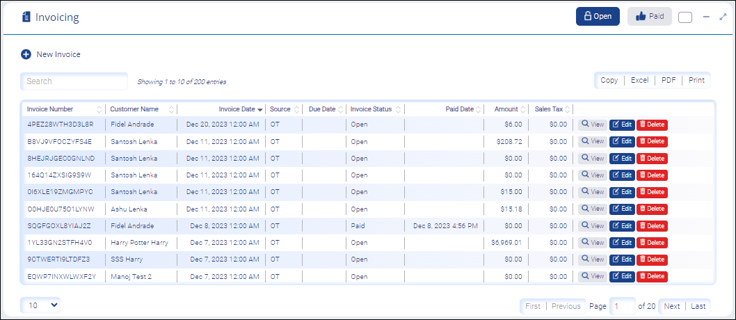
View the invoice report
|
|
|
Edit the invoice report
|
|
|
Delete the transaction data. The steps to delete the transaction are:
Note:
All invoice items will be deleted too
|
|
Field
|
Description
|
|
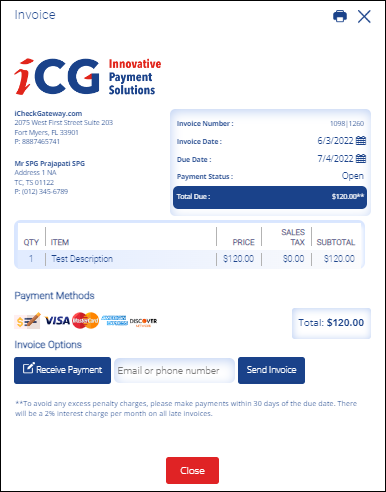
Receive Payment
|
Click here to do new transaction |
| Email or phone number | Enter email address or phone number |
|
Send Invoice
|
|
|
Close
|
Close the invoice screen |
Edit - Invoice
Click the Edit button. The Edit Invoice screen is displayed. There are two tabs:
- Invoices
- Invoice items
Invoices
Click the Invoices tab in the Edit Invoice screen.

|
Field
|
Description
|
|
Current Customers
|
Displays the current customers
|
|
Customer Postal Code
|
Displays the customer postal code
|
|
First Name
|
Displays the first name
|
|
Last Name
|
Displays the last name
|
|
Company
|
Displays the company name
|
|
Customer Email Address
|
Displays the customer email address
|
|
Customer Address 1
|
Displays the customer address 1
|
|
Customer Address 2
|
Displays the customer address 2
|
|
Customer City
|
Displays the customer city
|
|
Customer State/Province
|
Displays the customer state/province
|
|
Customer Postal Code
|
Displays the customer postal code
|
|
Customer Phone Number
|
Displays the customer phone number
|
|
To Email
|
Check the option to email the invoice
|
|
Invoice Number
|
Enter the invoice number
|
|
Invoice Date
|
Click the calendar widget and select the invoice date
|
|
Due Date
|
Click the calendar widget and select the invoice due date
|
|
Save
|
Save the edited data
|
|
Cancel
|
Close the Edit Invoice screen
|
Edit Invoice - Invoice items
Click the Invoice items tab in the Edit Invoice screen. The Invoice items screen is displayed.

|
Field
|
Description
|
|
Quantity
|
Displays the quantity
|
|
Description
|
Displays the description
|
|
Unit Price
|
Displays the unit price
|
|
Edit
|
Modify/update the invoice items
|
|
Delete
|
Delete the invoice items
|
|
Save
|
Save the invoice item
|
|
Cancel
|
Close the invoice item
|
Invoice items - Edit
Click the Edit button against the invoice items. The data are displayed at the bottom of the screen (highlighted in figure 6) under the respective field.

|
Field
|
Description
|
|
Description
|
Modify/Update the description
|
|
Quantity
|
Modify/Update the quantity
|
|
Unit Price
|
Modify/Update the unit price
|
| Update |
Click to update the modified data
|
Edit Invoice - Add Invoice Item
Click the Add Invoice Item button to add new invoice item. The Add Invoice Item screen pops up.

|
Field
|
Description
|
|
Description
|
Enter the description
|
|
Quantity
|
Enter the quantity
|
|
Unit Price
|
Enter the unit price
|
| Add |
Click to add the new item
|
| Save |
Click Save to save the added new item.
A success pop up is displayed.
|
| Cancel |
Close the add invoice item screen
|
Send Invoices
Send Invoices provides a list of open and paid invoices whose details can be sent to the client. You can also generate invoice reports in excel and PDF format.

- Click the Edit button to change the email sending status.
- Once you do so, the checkbox under the To Email column will be activated.
- You can then toggle the checkbox to your preference and then click Update or Cancel, depending on whether or not you want to save the choices made.
Upload Invoices
The Upload Invoices allows you to upload invoice details in bulk.

Figure 9 below illustrates a typical file that contains invoice details. Replace everything apart from the column names, then upload appropriately.

Once you’ve replaced the invoice numbers with your custom ones, alongside other data as illustrated, click on the NEXT button to proceed to the next screen, which previews the present data for redundancy and correctness.
The next screen will provide a preview of the data uploaded, similar to Figure 10 below. You can remove any data you may not want to upload by clicking on the red DELETE button.

Upon successful verification, click the green FINISH button to complete the transaction process. Click the All Invoices button to view a list of all available invoices.
