Manager Users Module helps you add new users and assign relevant permissions to them.
Table of Contents
|
Feature
|
Description
|
|
Active Merchant
|
Select the merchant in the drop-down to view the associated merchant transaction
|
| Language | Select the preferred language in the drop-down |
| Select to view dashboard in full screen | |
| Select to minimize the menu bar | |
| Search | Enter the entity to display the transaction data based on the search |
| Change the color of the widget | |
| - | Collapse the widget. Click again to expand the widget |
| View the widget in new page | |
| Search | Enter the required entity to fetch the associated transaction details. The entity can be Invoice Number, Customer Name, Invoice Date, Source, Due Date |
| Copy | Copy the transaction details in clipboard. The steps to copy the transaction are:
|
| Excel | Download the transaction data in excel format |
| Download the transaction data in PDF format | |
| Print the transaction data | |
| Edit | Click the Edit button to edit the User |
| Delete | Click the delete button to delete the user |
| Select to display the number of transaction per page. The valid values are 5, 10, 15, 25, 50, 100. | |
| First | Go to first page |
| Previous | Go to previous page |
| Next | Go to next page |
| Last | Go to last page |
Manage Users - Add Users
Click the Add Users link. The Add User screen is displayed. There are two tabs:
- Details
- Permissions
Add User - Details
Click the Details button.

Figure 1: Add User - Detail
|
Field
|
Description
|
|
User name
|
Enter the user name
|
|
Email Address
|
Enter the email address
|
|
First Name
|
Enter the first name
|
|
Last Name
|
Enter the last name
|
|
Mobile Phone
|
Enter the mobile phone number
|
|
Home Phone
|
Enter the home phone number
|
|
Office Phone
|
Enter the office phone number
|
|
Postal Code
|
Enter the postal code
|
|
Address 1
|
Enter the address 1
|
|
Address 2
|
Enter the address 2
|
|
City
|
Enter the city name
|
|
State
|
Select the appropriate state in the drop-down
|
|
Country
|
Select the appropriate country in the drop-down
|
|
Two Factor Authentication
|
Enter the two factor authentication
|
|
Password
|
Enter the password |
|
Confirm Password
|
Re-enter the password to confirm
|
|
Save
|
Click the Save button to save the information
|
|
Cancel
|
Click the Cancel button to close the Add User screen
|
Add User - Permissions
Click the Permissions button in the Add User screen.
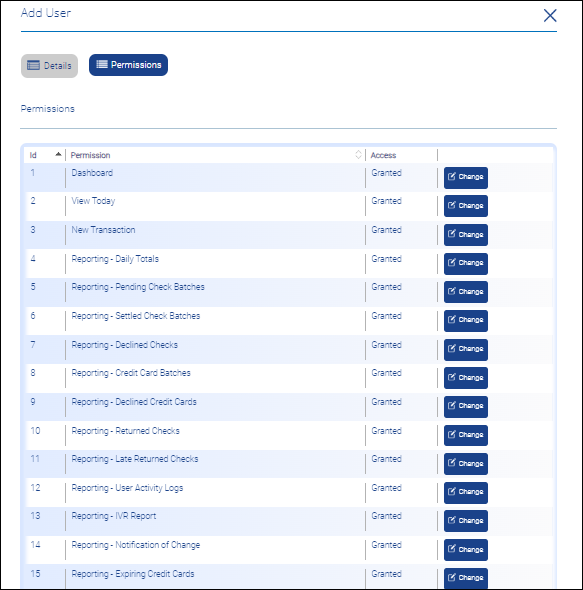 Figure 2: Add User - Permission.
| Field | Description |
| Id | Displays the Id |
| Permission | Displays the module available in the Online Terminal |
| Access | Displays the level of access permission given for the module of a User |
| Change | Click the Change button to modify the level of access from Granted to Restricted and vice versa. |
Manage User
Manage User provides the dashboard view of the all the Users details.
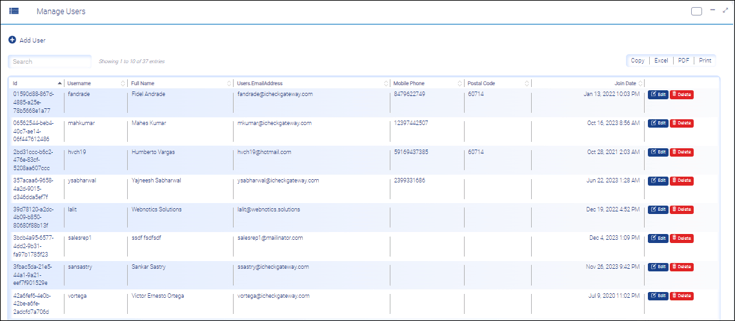 Figure 3: Manage User
| Field | Description |
| Id | Displays the Id number |
| Username | Displays the user name |
| Full Name | Displays the full name |
| Users.Email/Address | Displays the email Id of the user |
| Mobile Phone | Displays the mobile number |
| Postal Code | Displays the postal code |
| Join Date | Displays the join date |
| Edit | Edit the user |
| Delete | Delete the user |
Manage User - Edit
- Click the Edit button. The Edit User screen is displayed.
Edit User - Details
- Click the Details button in the Edit User screen
- The user details are auto-populated
- Edit the user information in the respective field, if required
- Click the Save button to save the edited information
- Click the Cancel button to close the Edit User screen

Figure 4: Manage User - Edit User
Manage User - Edit User - Permission
- Click the Permission tab in the Edit User screen.
- Click here to know the usage of Permission screen
Manage User - Delete User
- Click the Delete button
- The Delete User dialog box is displayed.
- Click Yes to delete the User
- Click No to retain the User and close the Delete User dialog box.
Note:
If you click No all user data will be deleted too.

Figure 5: Manage User - Delete User.